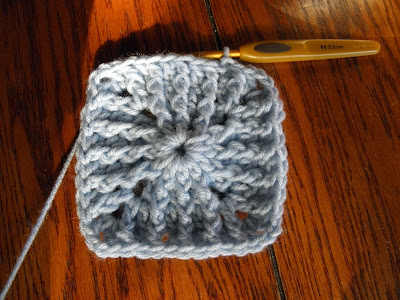
Ribbed Square by Andrea Harris
Photo Tutorial
Hello!
Once again I am posting a photo
tutorial of the 6 in. square choice for the 2012 BAMCAL Group in Ravelry. This is a different looking square because it
is RIBBED. So cool. I would like to thank the designer, AndreaHarris, who is Jitterie in Ravelry, for this great design, for posting it for
free, and for giving me permission to make this tutorial.
As always, I will keep the designer's
original instructions in black. Anything
I add for clarification will be written in blue.
Thank you again, Jitterie.
I want to say that this is an amazing looking square, but I did quite a bit of rewriting of the directions so that they made sense to me. I am not sure that I did the corners correctly, but the square mostly looks right. If there are any errors, it is my fault, and I will correct them as quickly as I can.
Abbreviations
used:
DC
- Double Crochet
SL
- slip stitch
FPDC
- Front Post Double Crochet
Ch - chain
Using
worsted weigh yarn and an H or I hook, 4 rows of RD3 makes a 6 inch square. To
make a square of another size, duplicate RD3 until square is 1 inch smaller
than required, then add HDC row.
Ch 4, connect
with SL to form ring; ch3
Ch 4,
connect with SL to form ring
RD1: 12 DC in
ring, connect to 3rd ch to connect
Round 1:
Ch3 (counts as first DC),
11 DC in ring
Connect with SL in top of original Ch3
(12 DC)
 |
| Round 1 |
3. RD2: SL
into next stitch, ch3; FPDC in first DC in previous row. fpdc in same DC; *DC
in top loop of next ST; FPDC in post of next DC in previous round* 2 times
(this results in 2 st per DC of 1st round, DC in top loop, FPDC
around post) Ch2, DC to make corner . *FPDC in DC; DC in loop 3 times, make
corner* 3 times. Connect with sl to 3rd
stitch of ch to connect
Round 2
Round 2
I did
not SL
Ch3
(counts as first DC)
FPDC
around post of SAME DC in previous round
[*DC
in next st
then
FPDC around same st in previous round*
* to *
2 times
ch2, DC
in next st to make corner
FPDC around
same st in previous round]
repeat
[ to ] 2 more times
Last
side repeat * to * 1 time
ch 2
connect with sl in top of original ch3 to make corner
(12
DC, 12 FPDC, 4 ch2 sp)
 | |
| Round 2 |
RD3: SL into next
ST, ch 3; FPDC on FPDC of previous round, DC in DC. After last FPDC, DC in next
loop, ch2 and DC in same ST to make corner. Continue like this around square.
Connect with SL in ch3
Round
3
I did
not sl
ch 3
(counts as first dc)
FPDC
around FPDC of previous round
*DC in
next DC
FPDC around
FPDC of previous round* 2 times
DC in
ch2 sp, ch 2, DC in same sp (corner made)
[*DC
in next DC, FPDC around FPDC of previous round* 3 times
make
corner (DC ch2 DC) in ch2 sp]
repeat
from [ to ] 2 more times
connect
with sl in top of first ch3
(20
DC, 12 FPDC, 4 ch2 sp)
 | |
| Round 3 |
RD4-5 Same as RD 3
Round
4
ch3
(counts as first DC)
FPDC
in FPDC of previous round
*DC in
next DC
FPDC
in FPDC of previous round* 2 times
DC in
next st
and
FPDC around same st in previous round
Make
Corner (DC ch2 DC) in ch2 sp
FPDC
around first DC in next side of previous
round
[*DC
in next DC
FPDC
in FPDC of previous round* * to * 3
times
DC in
next st
connect
with sl in top of original ch3
Round 5
Make
Corner (DC ch2 DC) in ch2 sp
connect
with sl in top of original ch3
(32 DC
, 28 FPDC, 4 Ch2 sp)
 | |
| Round 5 |
6. Final Round:
SL into next ST; INT BACK LOOP ONLY, HDC in each st of previou round to corner;
to make corner, HDC, DC, HDC. Continue around block in this manner. At last
stich, HDC in same ST as SL, HDC, connect with SL.
Round 6
ch2, (counts as first HDC)
HDC in back loop only of next 10 st
Join with sl in top of original ch2
finish off
I
used H hook (5.0 mm) but I hook loosely.
Thank you, again to Jitterie
for this wonderful textured square.
Stay safe and well.
Yours,
f1bercat
shaping the world with lots
of hooked ribbing.


phew! saviour!
ReplyDeletei was really struggling ;)
thanks so much!
xo
Thank you! This tutorial really helped me out!
ReplyDelete