Showing posts with label crochet square. Show all posts

Tuesday, July 15, 2014

Some Squares

Hello:

I have finished the first row (plus one square not shown) for the Wedding Afghan I am making (ok, the half of the Wedding Afghan, as my daughter, Allifer, is making the other half).

For the Final Round of Quidditch in the Harry Potter Knitting/Crochet House Cup (HPKCHC) this term, we had to craft something with 450 yds in two weeks.  Well, since I need to make 15 squares, and each square is about 100 yds, I decided to make 5 squares and hook them together for my Quidditch submission.

We are making the afghan out of Caron One Pound in Espresso, Beige, and Taupe.  I know, I have already made 2 afghans using these colors, and frankly, after the second one, I was pretty tired of them, but they go together really well, and make a nice neutral afghan that will go in many rooms without clashing (I hope).

I have been putting the squares up here as I finished them, but I haven't shown you the last two that I finished.

I took the Spider Square 

that I designed last year,
put her on a brick wall and gave her
BABIES!!

So much fun to play with and expand on this pattern.

The other square is a bit wonky, I need to work with it a bit more to get it to lie flat (I might have to steam this one ... really that means melt it a bit), but I still love it.  Puzan brought me a photo of some crochet last Sunday, and asked if I could figure out the pattern.  It's a bit tough to see if the stitches are sc or hdc but I made this square using sc.  Anyway, for right now, I'm calling it "Drips."
I didn't ride my bike today, taking one day off, but hoping to get on the bike early tomorrow before I tutor and it gets hot.  Because it has been super hot here.  ugh!

Peace,
f1bercat
shaping the planet with new afghan squares.


Thursday, March 28, 2013

FINISHED! An Afghan in 3 Months

Hello:

I have finished my Transfiguration OWL Afghan, WITH a border.  I used the beautiful Eight Pointed Flower Square by Julie Yeager.


The challenge was to "vanish over 2,400 yds of yarn."  I hooked up a square and weighed it to get an idea of how much yarn I was using per square ( about 124 yds), then multiplied that by 20 squares.  Already I had 2480 yds of yarn.  That didn't include the yarn to sew everything together, or the border rows.  I would easily make the required yardage.

The next part of the challenge was to learn and incorporate a new technique in the making of the afghan.  I learned a new method of starting and then joining crocheted rounds, Air Crochet. It is absolutely beautiful.  It really makes the joins invisible. Now that the Winter Term is almost over, I should have a bit more time (when I am not frantically knitting socks for Sock Madness), so I hope to do a demonstration of the technique here.  Though, if you follow the link I gave, you can just learn it that way.  It takes more time because you have to completely finish off every round.  And, that means a lot more weaving in.  I think it is worth it in the professional look of the finished product.

Because I know I have a problem with finishing, I made myself state in my OWL proposal that the half-way mark would include 12 squares, SEWN TOGETHER.  This was probably the smartest thing I could have done.  Every time I finished 4 squares, I ... sewed them together.  Then, I ... sewed that row to the rest of the afghan.  It is amazing how little finishing work you have to do if you finish as you go.  I don't know why I avoid this with knitting and crochet.  I mean, when I cook, I always clean as I go.  I put away ingredients as I use them so that when I am ready to pop what ever I am making in the oven, or sit down to eat, there is very little clean up.  Because of the new start/join technique (air crochet), I was weaving in each round as I finished it.  That meant that the only weaving in I had to do was the sewing ends.  Again, I did that as I sewed.  When I started the border rows yesterday, I had only to sew in the last row's ends.  There was no dreaded feeling in my stomach when I started the first border row because I knew I had NO OTHER ENDS left to sew in.

One other good thing about this afghan.  I often wing the colors of crochet squares as I go.  Because you have to submit a plan for your OWL before you start, I had to really think about the plan of each square, what colors I was going to use, and how I was going to hook it together.  I think you can see a bit of the two rugs in the above photo that inspired the colors.  Also, it was really nice to have made a plan in advance of how I would rotate the various color combinations.  If you look closely though, you will see one random variation of the color scheme.  I had to throw one odd square in, just for fun.  It was completely spontaneous.  I can only change so much.

Here is what the back looks like:

I would like to thank the designer of the square, Julie Yeager, for such a beautiful design.  I think it takes a strong square to make an entire afghan, and not look boring.  This square allows for so many color combinations. 

A complete success.

Peace,
f1bercat
shaping the planet with a new afghan.


Thursday, January 17, 2013

The First 3 Squares


Hello:

Super weird weather here;  freezing fog.  We are having "dead air" where there is no wind or rain, and our air quality is getting poor, so the county has issued a burn ban meaning no wood fires in fire places, wood stoves, bonfires, fire pits, etc.  I have never seen anything like this.  It's a fog that never burns off.

Anyway, I have finished the third square of my Transfiguration OWL Afghan. Again, I am using Julie Yeager's Eight Pointed Flower Square.


I am still trying to decide how I want to seam the squares together.

The squares will have either a navy or a "claret" (dark red) single crochet border.  These will alternate so I never have two squares with the same color border together.  I hooked the first two squares together with a contrasting color (beige) that is visible from the right side.


I hooked the third square on with an invisible seam.
At first, I thought I would go with the contrasting color seam showing.  I have 3 votes so far:  2 for invisible, 1 for seam showing.  Now that I have the two to compare, I am thinking that I like invisible better.

What do you think?
I need to have at least 6 squares finished, and seamed by the end of the month, along with all my other knitting.  EEEK!  I need to decide this soon.  Until then, I will keep making the squares. 

Let me know which looks the best.

Peace.
Yours,
f1bercat
shaping the planet in a freezing fog.


Saturday, September 1, 2012

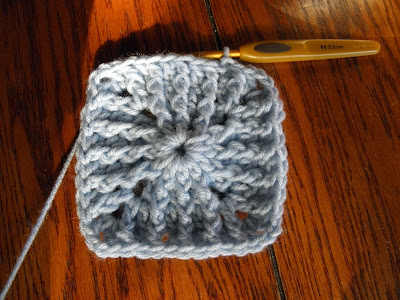
Photo Tutorial for Ribbed Square by Andrea Harris


Ribbed Square by Andrea Harris
Photo Tutorial

Hello!
Once again I am posting a photo tutorial of the 6 in. square choice for the 2012 BAMCAL Group in Ravelry.  This is a different looking square because it is RIBBED.  So cool.  I would like to thank the designer, AndreaHarris, who is Jitterie in Ravelry, for this great design, for posting it for free, and for giving me permission to make this tutorial.

As always, I will keep the designer's original instructions in black.  Anything I add for clarification will be written in blue.

Thank you again, Jitterie.

I want to say that this is an amazing looking square, but I did quite a bit of rewriting of the directions so that they made sense to me. I am not sure that I did the corners correctly, but the square mostly looks right.  If there are any errors, it is my fault, and I will correct them as quickly as I can.

Abbreviations used:
DC - Double Crochet
SL - slip stitch
FPDC - Front Post Double Crochet
Ch - chain


Using worsted weigh yarn and an H or I hook, 4 rows of RD3 makes a 6 inch square. To make a square of another size, duplicate RD3 until square is 1 inch smaller than required, then add HDC row.


Ch 4, connect with SL to form ring; ch3
Ch 4, connect with SL to form ring

RD1: 12 DC in ring, connect to 3rd ch to connect

Round 1:
Ch3 (counts as first DC),


11 DC in ring


Connect with SL in top of original Ch3  
(12 DC)

Round 1


3. RD2: SL into next stitch, ch3; FPDC in first DC in previous row. fpdc in same DC; *DC in top loop of next ST; FPDC in post of next DC in previous round* 2 times (this results in 2 st per DC of 1st round, DC in top loop, FPDC around post) Ch2, DC to make corner . *FPDC in DC; DC in loop 3 times, make corner* 3 times.  Connect with sl to 3rd stitch of ch to connect  

Round 2

I did not SL
Ch3 (counts as first DC)


FPDC around post of SAME DC in previous round


[*DC in next st 


then FPDC around same st in previous round*


* to * 2 times


ch2, DC in next st to make corner


FPDC around same st in previous round]


repeat [ to ] 2 more times


Last side repeat * to * 1 time


ch 2 connect with sl in top of original ch3 to make corner
(12 DC, 12 FPDC, 4 ch2 sp)

Round 2

RD3: SL into next ST, ch 3; FPDC on FPDC of previous round, DC in DC. After last FPDC, DC in next loop, ch2 and DC in same ST to make corner. Continue like this around square. Connect with SL in ch3

Round 3
I did not sl
ch 3 (counts as first dc)


FPDC around FPDC of previous round


*DC in next DC


FPDC around FPDC of previous round* 2 times 


DC in ch2 sp, ch 2, DC in same sp (corner made)


[*DC in next DC, FPDC around FPDC of previous round* 3 times


make corner (DC ch2 DC) in ch2 sp]


repeat from [ to ] 2 more times 


connect with sl in top of first ch3
(20 DC, 12 FPDC, 4 ch2 sp)
Round 3

 RD4-5 Same as RD 3

Round 4
ch3 (counts as first DC)


FPDC in FPDC of previous round


*DC in next DC


FPDC in FPDC of previous round* 2 times


DC in next st


and FPDC around same st in previous round


Make Corner (DC ch2 DC) in ch2 sp


FPDC around first DC in next side of previous round


[*DC in next DC  


FPDC in FPDC of previous round*  * to * 3 times


DC in next st  


and FPDC around same st in previous round
Make Corner (DC ch2 DC) in ch2 sp

FPDC around first DC in next side of previous round] [ to ] 3 times


connect with sl in top of original ch3
(20 FPDC, 24 DC, 4 ch2 sp)
Round 4
I measured here, and decided to make another round.

Round 5
Ch3 (counts as first DC)

FPDC in 2nd FPDC of previous round

*DC in next DC

FPDC in FPDC of previous round* 3 times 


DC in next st

and FPDC around same st in previous round

Make Corner (DC ch2 DC) in ch2 sp

FPDC around first DC  in next side of previous round

[DC in top of first FPDC  

FPDC around same FPDC of previous round

*DC in next DC, FPDC in next FPDC of previous round*  * to * 3 times


DC in next st and FPDC around same st in previous round

Make Corner (DC ch2 DC) in ch2 sp
FPDC around first DC in next side of previous round] [ to ] 3 times


DC in top of first FPDC on the first side and FPDC around same FPDC

connect with sl in top of original ch3
(32 DC , 28 FPDC, 4 Ch2 sp)

Round 5


6. Final Round: SL into next ST; INT BACK LOOP ONLY, HDC in each st of previou round to corner; to make corner, HDC, DC, HDC. Continue around block in this manner. At last stich, HDC in same ST as SL, HDC, connect with SL.


Round 6
ch2, (counts as first HDC)
HDC in back loop only of next 10 st


Make corner (HDC, DC, HDC) in ch2 sp,

[HDC in back loop only of next 15 st

Make corner (HDC, DC, HDC) in ch2 sp] 3 times 


HDC in back loop only of next 4 stitches

Join with sl in top of original ch2
finish off
(68 HDC, 4 DC)
Round 6 Finished Square

I used H hook (5.0 mm) but I hook loosely. 

Thank you, again to Jitterie for this wonderful textured square.

Stay safe and well.
Yours,
f1bercat
shaping the world with lots of hooked ribbing.