Showing posts with label Ribbed Square. Show all posts

Friday, September 14, 2012

X or "Gebo" is the Ancient Rune meaning "Gift"

6:00 am Friday, September 14, 2012

Hello!

Stitching

I have been working like a dog this week.  As I said in my post yesterday, the HPKCHC (Harry Potter Knitting and Crochet House Cup) Group on Ravelry, has me really hopping to complete classes.  It's not that I am making anything different from what I would already be stitching, but there is a big push to get stuff in early.  I assume that is so people actually finish things.  So I am honestly stitching from 6 am until I fall asleep at the needles at around 10 or 11 pm.  Last night I stayed up to post my blog, which I had been neglecting from lack of sleep, and that meant I went to bed around 1 am. EEEEK!

I wanted to tell you about my Ancient Runes class.

This class prompt was super confusing to me.  At first I did not see at all how I could make anything for the class, much less turn in something I had already planned to make.  Let me quote some of the prompt:

With the return of Ancient Runes to this Term’s study, we are going to begin by studying the origin of runes from a historical perspective. Whereas some use Runes for divination purposes, we will be studying the runes as a form of writing only. For mystical applications, please see Professor Trelawney and her Divination class.” “There are different opinions regarding when and where the pre-Christianity Germanic runic alphabet began, but some Muggle scholars believe it to have originated in Sweden.....

Her wand flashes in the air as if conducting a symphony and unfamiliar letter like figures begin to dance and swirl around the room:
Your assignment this month is to study and craft an item, spin, or dye yarn inspired by the runes themselves, by the Norse & Germanic cultures from which they arose, or inspired by your own heritage. Be sure to share a summary of your research and explain how it is reflected in your class project.
When completing your homework, please refer to the Project Standards and General Rules of Conduct and Crafting pages for further information on how to turn in projects for the cup and additional information. Also, please the use the standard header, below, when turning in your homework."


Honestly, at first I was like... Whaaaaaat?

So, like a chicken, I worked on other classes, and figured that I wouldn't try to turn in for this one.  But then, I decided to check out what HAD been turned in.  People were talking a bit about the runes,


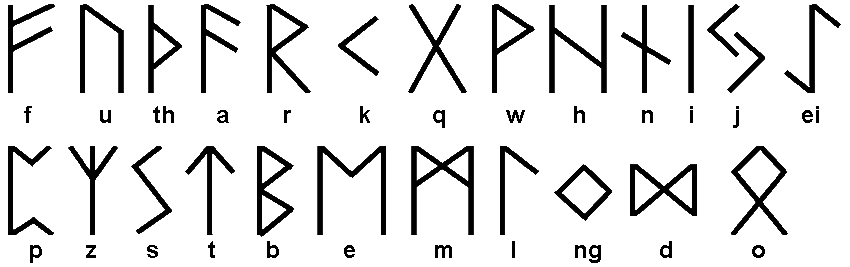
their meanings, and then showing how the shape of the rune was in their project.  Like how a stitch or pattern formed a rune.  I could do that! I did some quick research on wikipedia, and discovered that 2 of the runes have nice shapes that regularly appear in crocheted squares:  X and I.

The X and the I were perfect for the Ribbed Square that I had already made for the 2012BAMCAL.


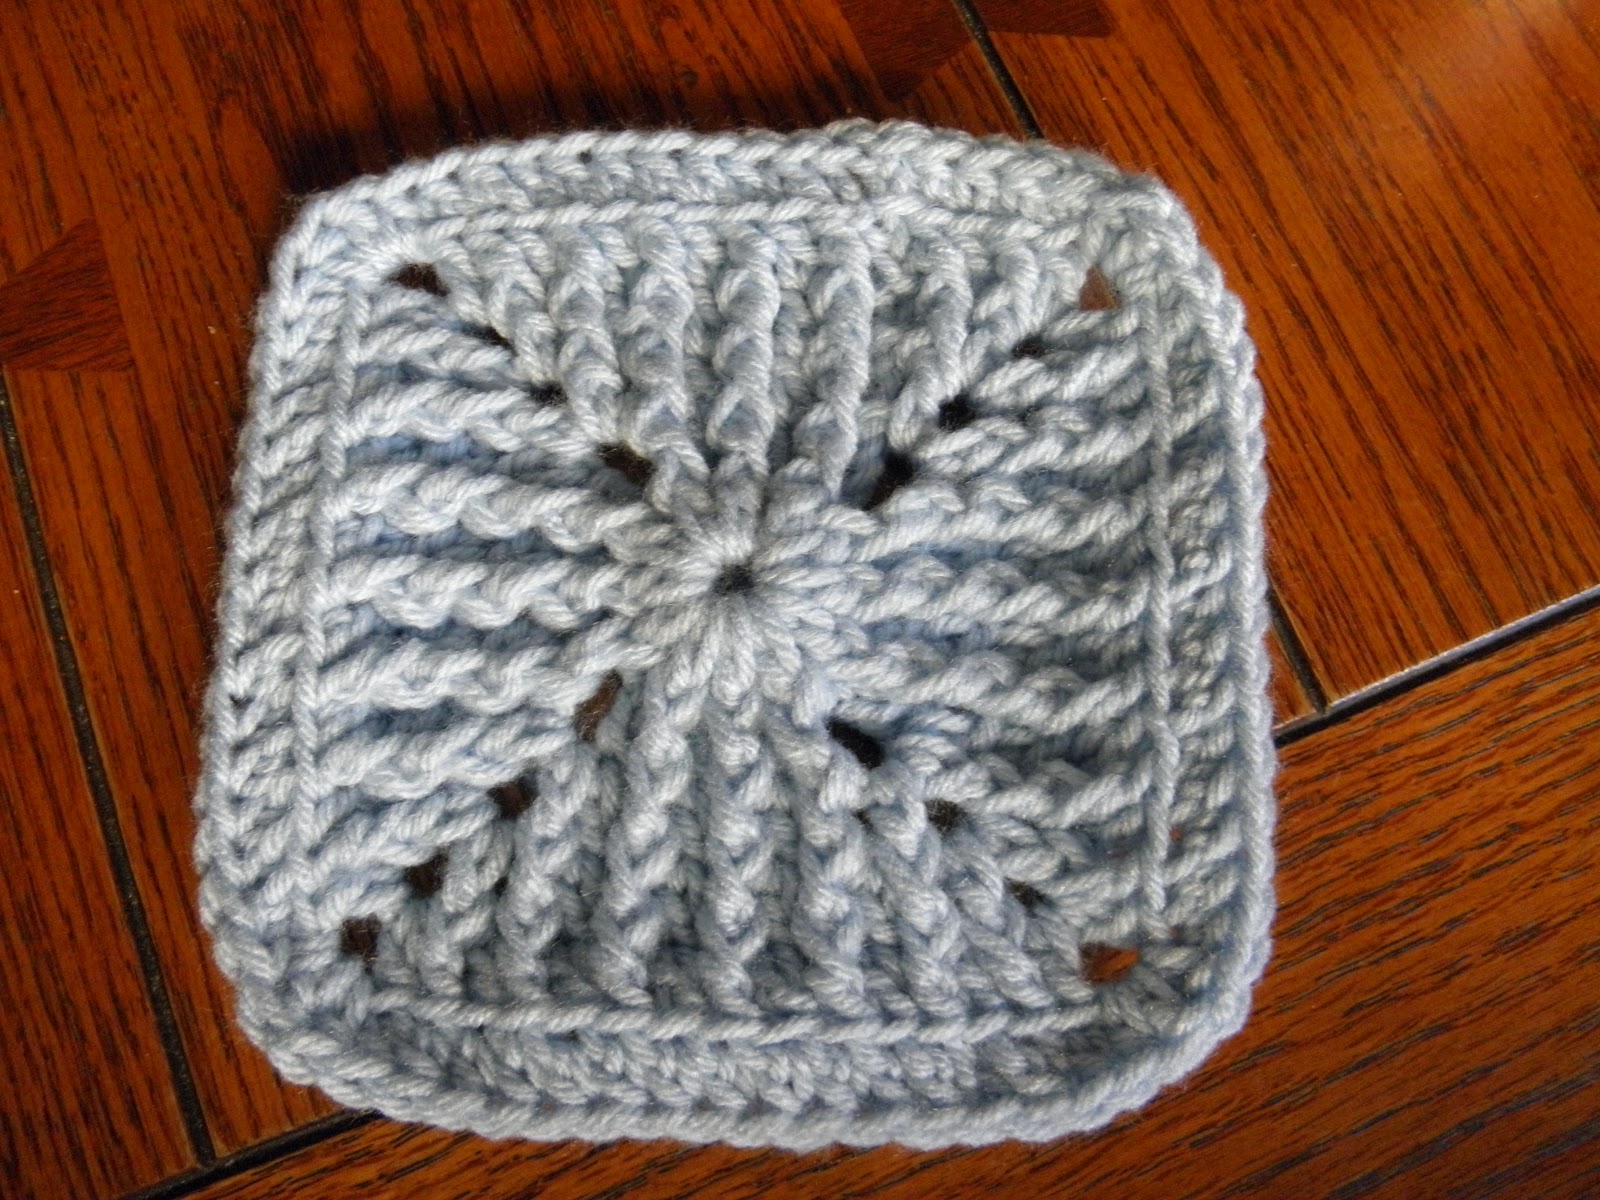
HPKCHC has a size requirement for blanket squares of about 8" x 8", so I would need to make more than one of these 6 in squares.  Part of the turn in is the "story" or selling your project to the professors.

I hooked 3 more squares, and in 2 of them alternated blue and white, with the white on the fpdc (front post double crochet) so they stood out.


Then I sewed them all together and added a crocheted border.   I just need to turn in my explanation of how the square fits the prompt and a photo with measurements of the finished object.

"Inspired by the rune X gebo or "gift"  (this square is for a blanket that is a gift),  and the rune I isaz or "ice."  The isaz rune is repeated on almost every round of the square, and is a reminder of the warmth the finished blanket will bring, protecting the recipient from the cold.  Also, the Rune X (gebo) is in each quadrant of the square."


Whether or not it is accepted for the Ancient Runes homework, I really love how this square came out.

Gryffindor Gym
So I am working my way through the various Gryffindor threads, and I found 2 that were new to me.  One of them is the Gryffindor Gym.  In this thread, you state a fitness goal, then post regularly how you are doing.  People are working on everything from losing weight to running a 5K.  Some people are very specific, others vague.  The moderator must be either a trainer or dietician in real life, because she gives great advice to help work towards the goals.  For instance, one member has broken her foot.  So the moderator suggested all kinds of exercises she could do with weights at the gym, or at home, to stay in shape.  Very cool.

I plan to get back on my bike trip and post about it in the Gym thread.  I haven't been to the Y since before I left for California back in July.  I need to get back on it.  Hopefully, posting on the Gym thread will help me find the motivation.

Stay safe and well.
Yours,
f1bercat
Shaping the planet one ancient rune at a time.

6:30 am September 14, 2012


Saturday, September 1, 2012

Photo Tutorial for Ribbed Square by Andrea Harris


Ribbed Square by Andrea Harris
Photo Tutorial

Hello!
Once again I am posting a photo tutorial of the 6 in. square choice for the 2012 BAMCAL Group in Ravelry.  This is a different looking square because it is RIBBED.  So cool.  I would like to thank the designer, AndreaHarris, who is Jitterie in Ravelry, for this great design, for posting it for free, and for giving me permission to make this tutorial.

As always, I will keep the designer's original instructions in black.  Anything I add for clarification will be written in blue.

Thank you again, Jitterie.

I want to say that this is an amazing looking square, but I did quite a bit of rewriting of the directions so that they made sense to me. I am not sure that I did the corners correctly, but the square mostly looks right.  If there are any errors, it is my fault, and I will correct them as quickly as I can.

Abbreviations used:
DC - Double Crochet
SL - slip stitch
FPDC - Front Post Double Crochet
Ch - chain


Using worsted weigh yarn and an H or I hook, 4 rows of RD3 makes a 6 inch square. To make a square of another size, duplicate RD3 until square is 1 inch smaller than required, then add HDC row.


Ch 4, connect with SL to form ring; ch3
Ch 4, connect with SL to form ring

RD1: 12 DC in ring, connect to 3rd ch to connect

Round 1:
Ch3 (counts as first DC),


11 DC in ring


Connect with SL in top of original Ch3  
(12 DC)

Round 1


3. RD2: SL into next stitch, ch3; FPDC in first DC in previous row. fpdc in same DC; *DC in top loop of next ST; FPDC in post of next DC in previous round* 2 times (this results in 2 st per DC of 1st round, DC in top loop, FPDC around post) Ch2, DC to make corner . *FPDC in DC; DC in loop 3 times, make corner* 3 times.  Connect with sl to 3rd stitch of ch to connect  

Round 2

I did not SL
Ch3 (counts as first DC)


FPDC around post of SAME DC in previous round


[*DC in next st 


then FPDC around same st in previous round*


* to * 2 times


ch2, DC in next st to make corner


FPDC around same st in previous round]


repeat [ to ] 2 more times


Last side repeat * to * 1 time


ch 2 connect with sl in top of original ch3 to make corner
(12 DC, 12 FPDC, 4 ch2 sp)

Round 2

RD3: SL into next ST, ch 3; FPDC on FPDC of previous round, DC in DC. After last FPDC, DC in next loop, ch2 and DC in same ST to make corner. Continue like this around square. Connect with SL in ch3

Round 3
I did not sl
ch 3 (counts as first dc)


FPDC around FPDC of previous round


*DC in next DC


FPDC around FPDC of previous round* 2 times 


DC in ch2 sp, ch 2, DC in same sp (corner made)


[*DC in next DC, FPDC around FPDC of previous round* 3 times


make corner (DC ch2 DC) in ch2 sp]


repeat from [ to ] 2 more times 


connect with sl in top of first ch3
(20 DC, 12 FPDC, 4 ch2 sp)
Round 3

 RD4-5 Same as RD 3

Round 4
ch3 (counts as first DC)


FPDC in FPDC of previous round


*DC in next DC


FPDC in FPDC of previous round* 2 times


DC in next st


and FPDC around same st in previous round


Make Corner (DC ch2 DC) in ch2 sp


FPDC around first DC in next side of previous round


[*DC in next DC  


FPDC in FPDC of previous round*  * to * 3 times


DC in next st  


and FPDC around same st in previous round
Make Corner (DC ch2 DC) in ch2 sp

FPDC around first DC in next side of previous round] [ to ] 3 times


connect with sl in top of original ch3
(20 FPDC, 24 DC, 4 ch2 sp)
Round 4
I measured here, and decided to make another round.

Round 5
Ch3 (counts as first DC)

FPDC in 2nd FPDC of previous round

*DC in next DC

FPDC in FPDC of previous round* 3 times 


DC in next st

and FPDC around same st in previous round

Make Corner (DC ch2 DC) in ch2 sp

FPDC around first DC  in next side of previous round

[DC in top of first FPDC  

FPDC around same FPDC of previous round

*DC in next DC, FPDC in next FPDC of previous round*  * to * 3 times


DC in next st and FPDC around same st in previous round

Make Corner (DC ch2 DC) in ch2 sp
FPDC around first DC in next side of previous round] [ to ] 3 times


DC in top of first FPDC on the first side and FPDC around same FPDC

connect with sl in top of original ch3
(32 DC , 28 FPDC, 4 Ch2 sp)

Round 5


6. Final Round: SL into next ST; INT BACK LOOP ONLY, HDC in each st of previou round to corner; to make corner, HDC, DC, HDC. Continue around block in this manner. At last stich, HDC in same ST as SL, HDC, connect with SL.


Round 6
ch2, (counts as first HDC)
HDC in back loop only of next 10 st


Make corner (HDC, DC, HDC) in ch2 sp,

[HDC in back loop only of next 15 st

Make corner (HDC, DC, HDC) in ch2 sp] 3 times 


HDC in back loop only of next 4 stitches

Join with sl in top of original ch2
finish off
(68 HDC, 4 DC)
Round 6 Finished Square

I used H hook (5.0 mm) but I hook loosely. 

Thank you, again to Jitterie for this wonderful textured square.

Stay safe and well.
Yours,
f1bercat
shaping the world with lots of hooked ribbing.